Configure custom SCIM attributes
We have enabled the use of two custom attributes, so you’re able to control these from Entra ID:
- role → sets user’s role
- path → sets domain path location for a created user or group
By default, a user will be provisioned with the LinkManager User role. When needed, you can instead provision a Domain Admin or a Basic Admin, by using the field values as shown in the table below:
| Role | Entra ID Field Value |
|---|---|
| LinkManager User | LinkManager_User (By Default) |
| Domain Administrator | Domain_Administrator |
| Basic Administrator | Basic_Administrator |
| Domain Observer | Domain_Observer |
By default, a user or group will be placed in a SCIM/Users or SCIM/Groups domain folder, respectively, in the Secomea solution. You can however specify a subdomain inside the SCIM domain to place the resource in. This can be a domain folder that’s already previously been created, or a new one, in which case our SCIM Service will facilitate the domain folder creation.
See the below steps for how to configure the use of the two custom attributes.
Step 1. Add Custom SCIM Attributes
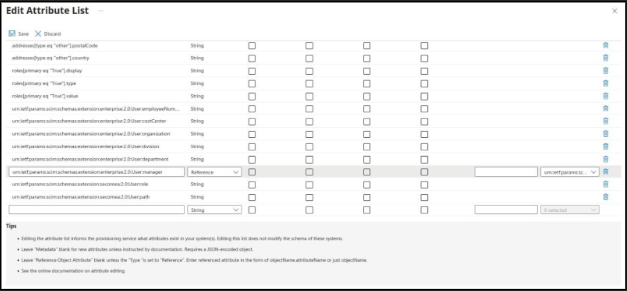
In the Entra SCIM tenant, paste the full SCIM URN into the Name column. Then set Type = String. Leave Required and Multi-Value unchecked:
- Open your SCIM Enterprise App → Provisioning → Mappings.
- For Users → Show advanced options → Edit attribute list for Provision Azure Active Directory Users.
- At the bottom, click Add attribute and add:
| Name | Type |
|---|---|
| urn:ietf:params:scim:schemas:extension:secomea:2.0:User:role | String |
| urn:ietf:params:scim:schemas:extension:secomea:2.0:User:path | String |
- Click Save at the top.
- Repeat for Groups: Provision Azure AD Groups → Edit attribute list → Add attribute:
| Name | Type |
|---|---|
| urn:ietf:params:scim:schemas:extension:secomea:2.0:Group:path | String |
- Save
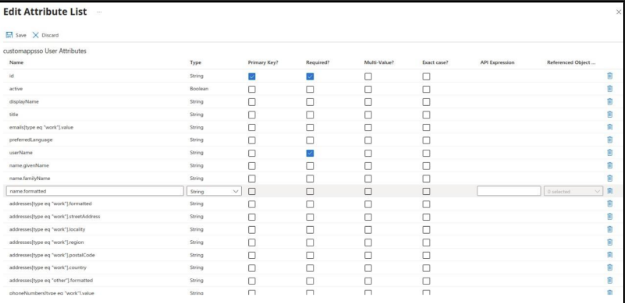
Before adding custom attributes (core-only list):
After adding custom attributes (role & path appear in the list):
Step 2. Map Attributes
Users:
Provision Azure AD Users → Edit attribute mappings → Add new mapping (twice):
| Source | Target |
|---|---|
| extensionAttribute1 | urn:ietf:params:scim:schemas:extension:secomea:2.0:User:role |
| extensionAttribute2 | urn:ietf:params:scim:schemas:extension:secomea:2.0:User:path |
Save.
Groups:
Provision Azure AD Groups → Edit attribute mappings → Add new mapping:
| Setting | Value |
|---|---|
| Mapping type | Expression |
| Expression | Word([description], 2, "||") |
| Target attribute | urn:ietf:params:scim:schemas:extension:secomea:2.0:Group:path |
Save.
Step 3. Verify configuration with a Provision on Demand
Provision on Demand a test user and group where custom attribute values are set. For instructions on setting these values, see Set a user role with SCIM, Set a user domain location with SCIM, and Set a group domain location with SCIM.
Confirm that the provisioned user or group includes your extension blocks.
User example of correct extension block in outbound JSON:
{
  "urn:ietf:params:scim:schemas:extension:secomea:2.0:User": {
    "role": "LMU",
    "path": "Antarctica/RossIceShelf"
  }
}
Group example of correct extension block in outbound JSON:
{
  "urn:ietf:params:scim:schemas:extension:secomea:2.0:Group": {
    "path": "Antarctica/RossIceShelf"
  }
}