The purpose of this article is to guide you through a Proof of Concept setup. This setup is meant to be an easy way of getting, data sent from the SiteManager to the Cumulocity Cloud. Simulated data from the DCM Collector Simulator is used. The data collected can later be changed, to collect from real devices as PLC, HMI etc.
Cumulocity setup example
-
Create a data collector agent to enable DCM, as device type select GENERIC and Data Collector Module Device

- Note the collector name (What comes after dcmcn= in Device IP & Parameters) as the name is used later when the configuration is created.
-
Install certificate trust chain for the Cumulocity Cloud. The trust chain must be in PEM format. Either create a PEM file with a trust chain, giving trust to *.cumulocity.com or use the attached PEM file.
-
Go to SiteManager GUI > DCM > Certificates and click new to add the certificate file.
Select Cumulocity ROOT-CA as type, enter a name (f.ex. cumulocityROOTCA) and click browse to select the PEM file, then click import.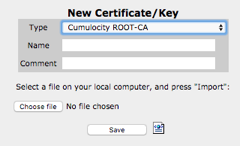
-
Note the name of the certificate entry, as this must be used in a later step.
-
-
Tell Cumulocity about the SiteManager connecting.
-
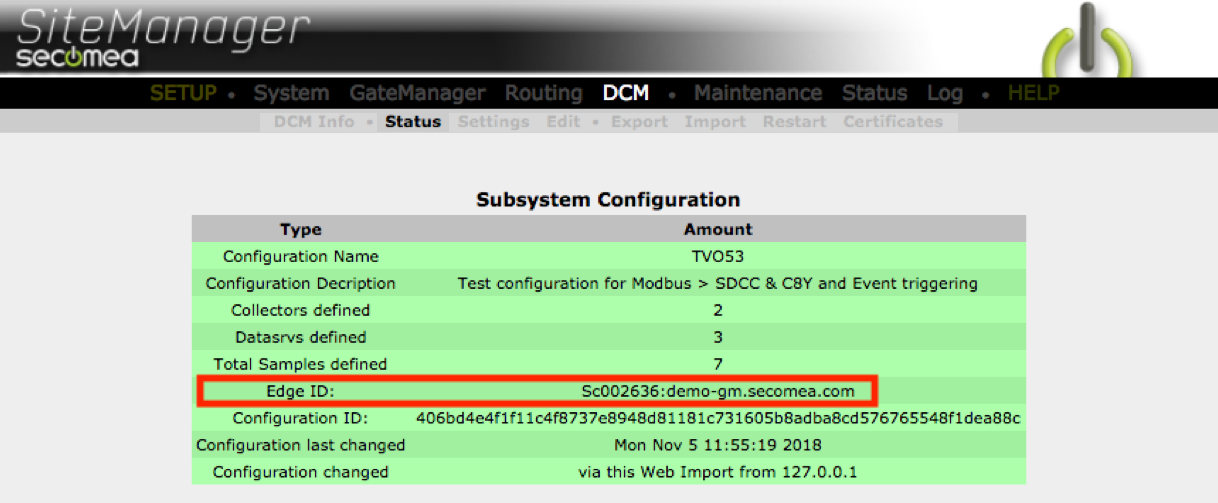
Go to SiteManager GUI > DCM > Status > Details > Subsystem Configuration > and copy the Edge ID.
-
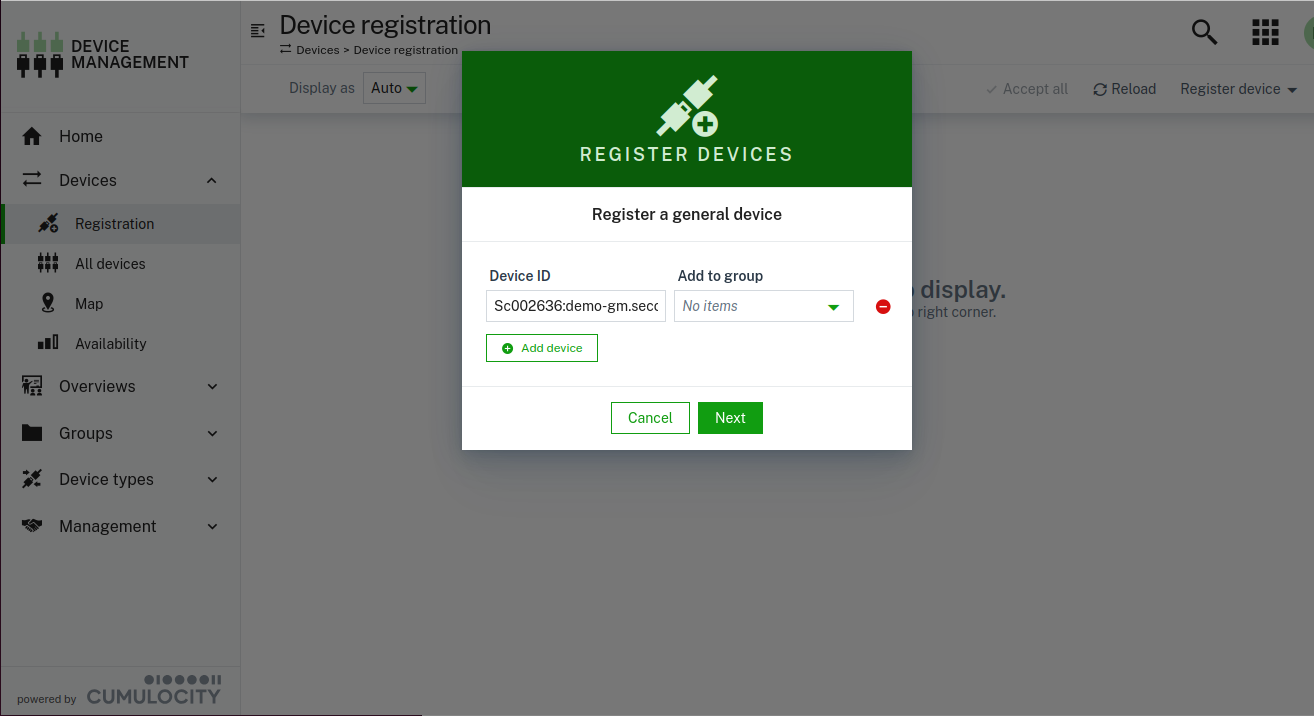
Go to your Cumulocity Device administration > registration and register the SiteManager Edge ID.
-
-
Configure the DCM.
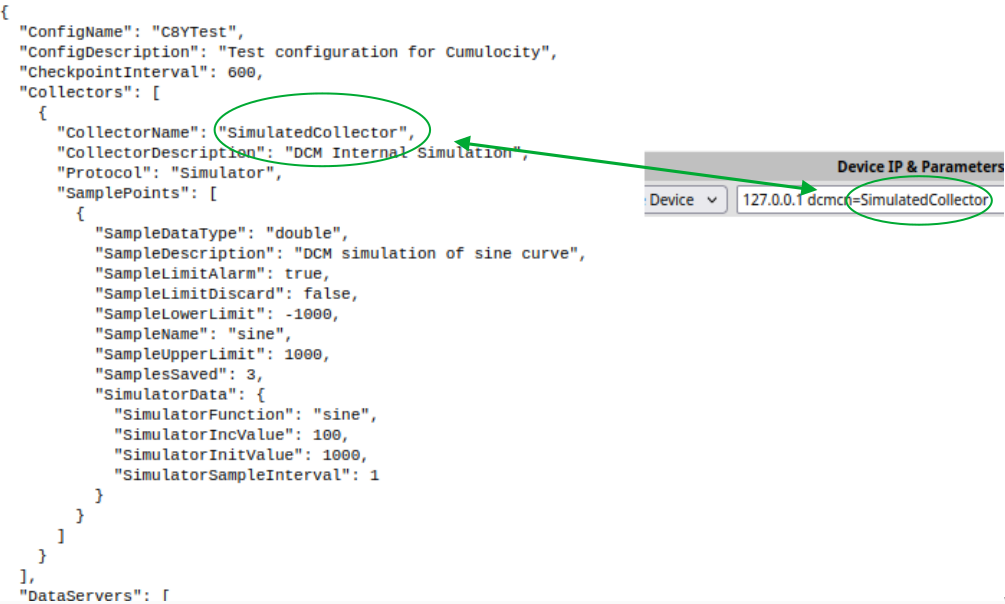
- Go to SiteManager GUI > DCM > Edit and copy + paste the example configuration into the window (replacing any previous content).
{ "ConfigName": "C8YTest", "ConfigDescription": "Test configuration for Cumulocity", "CheckpointInterval": 600, "Collectors": [ { "CollectorName": "SimulatedCollector", "CollectorDescription": "DCM Internal Simulation", "Protocol": "Simulator", "SamplePoints": [ { "SampleDataType": "double", "SampleDescription": "DCM simulation of sine curve", "SampleLimitAlarm": true, "SampleLimitDiscard": false, "SampleLowerLimit": -1000, "SampleName": "sine", "SampleUpperLimit": 1000, "SamplesSaved": 3, "SimulatorData": { "SimulatorFunction": "sine", "SimulatorIncValue": 100, "SimulatorInitValue": 1000, "SimulatorSampleInterval": 1 } } ] } ], "DataServers": [ { "DatasrvName": "secomea_c8y", "DatasrvProtocol": "C8Y/REST", "ConnectRetryMin": 2, "ConnectRetryMax": 10, "C8YParams": { "C8YRegisterURL": "https://SecomeaPresales.cumulocity.com", "RegName": "c8yreg", "C8YRootCAName": "cumulocityROOTCA", "PushInterval": 30 } } ] } - Verify the following settings (Change them if needed):
- That the collector name matches the name given when creating the agent entry.
- That the Cumulocity URL matches your subscription at Cumulocity

- That C8YRootCAName entry matches the name given when loading the certificate trust chain in a previous step.
- That the collector name matches the name given when creating the agent entry.
- Push the save button. This start (or restart) the DCM. If the DCM does not restart go to SiteManager GUI > DCM > Restart and restart the DCM.
- Go to SiteManager GUI > DCM > Edit and copy + paste the example configuration into the window (replacing any previous content).
-
When a device is registered in the Cumulocity cloud a second certificate will appear in SiteManager GUI > DCM > Certificates.

Next
Go to the Dataserver Cumulocity IoT Guide to learn more about the DCM configuration of the connection between DCM and Cumulocity.
Go to DCM config file structure and exiting to learn more about the DCM configuration in general.