Getting Started with DCM - Data Collection Cloud by Secomea
- 21 Apr 2021
- 3 Minutes to read
- Contributors

- Print
- DarkLight
- PDF
Getting Started with DCM - Data Collection Cloud by Secomea
- Updated on 21 Apr 2021
- 3 Minutes to read
- Contributors
- Print
- DarkLight
- PDF
Article Summary
Share feedback
Thanks for sharing your feedback!
The purpose of this article is to guide you through a Proof of Concept setup.
This setup is meant to be an easy way of getting, at first, simulated data to Data Collection Cloud (DCC) and then later you can add setup for your own devices eg PLC's, HMI's etc. for data collection from those.
Prerequisite
- SiteManager with firmware v9.0.17 or higher
- GateManager account
- DataCollectionCloud (DCC) account or trial (Get a 30 day free trial here)
Note: From version 9.0.17 (19192) DCM requires NTP to be enabled in the SiteManager.
See more info here.
See more info here.
Preparing the Data Collection Cloud (DCC) for access to SiteManager/DCM
Step by Step:
Add GateManager Domain if not already added. (if added please skip the #### section)
How to add a GateManager Domain to the DCC.
The LinkManager Mobile account created by the following section is the link between DCC and the GateManager, the location of the LinkManager account and/or joining of the account determines which subdomains and SiteManagers can be seen in the DCC
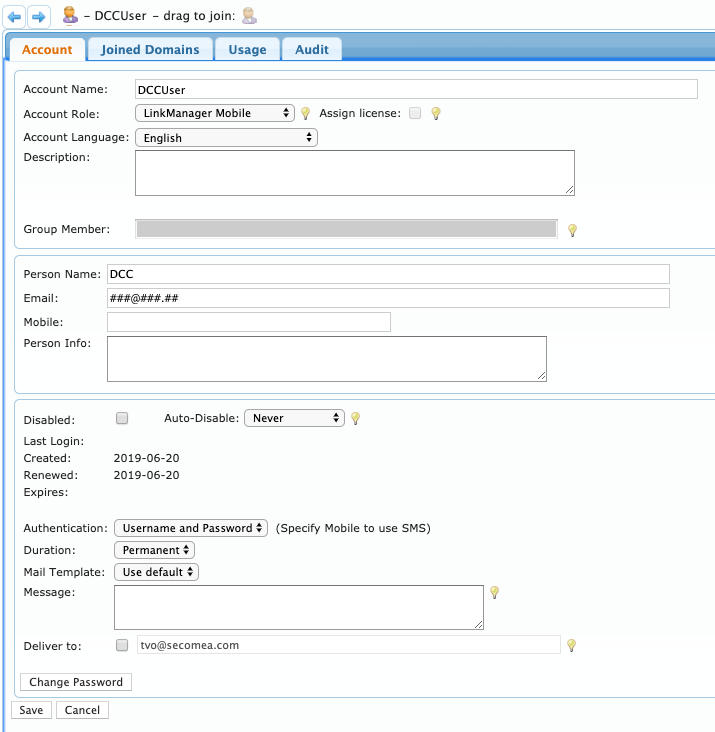
Go to your GateManager account and add a LinkManager Mobile account
Please create an account designated for the cloud only
No spaces allowed in the Account Name
Authentication must be Username/password
Password
Will be sent to you in a mail with a one time password
Licence
No licence is needed
Login to https://dcc.secomea.com
Under Account Setup click "New domain"
Enter the details:
- GateManager name:
- A descriptive name, Demo or Test are not descriptive !
(Domain or Company + Domain of the LMM account used would be better.)
- A descriptive name, Demo or Test are not descriptive !
- FQDN: The GateManager URL eg: demo-gm.secomea.com or gmxx.secomea.com
- LinkManager Mobile Account name of the account created earlier
- LinkManager Mobile Password of the account created (One time password received in the mail)
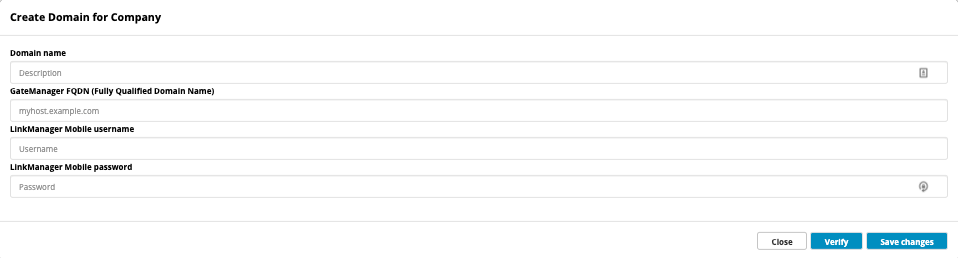

Click **Verify ** to check the connection between DCC and GateManager (LinkManager Mobile account)
The cloud will detect if the password is a one time password and create a new password.
Now only the Cloud and GateManager knows the password, securing against unwanted use of the LinkManager Mobile account
Click Save password to save the settings.
Preparing the SiteManager DCM to be added to the DCC
In this article a complete PoC setup for DCM will be retrieved from the DCC.
This setup is recommended for new users with a new unused SiteManager.
Notice previous configured Agents, DCM config and installed Certificates will be deleted.
Alternatively you can use the alternative config and add the needed agent manually.
Alt. config link.
Log in to https://dcc.secomea.com/
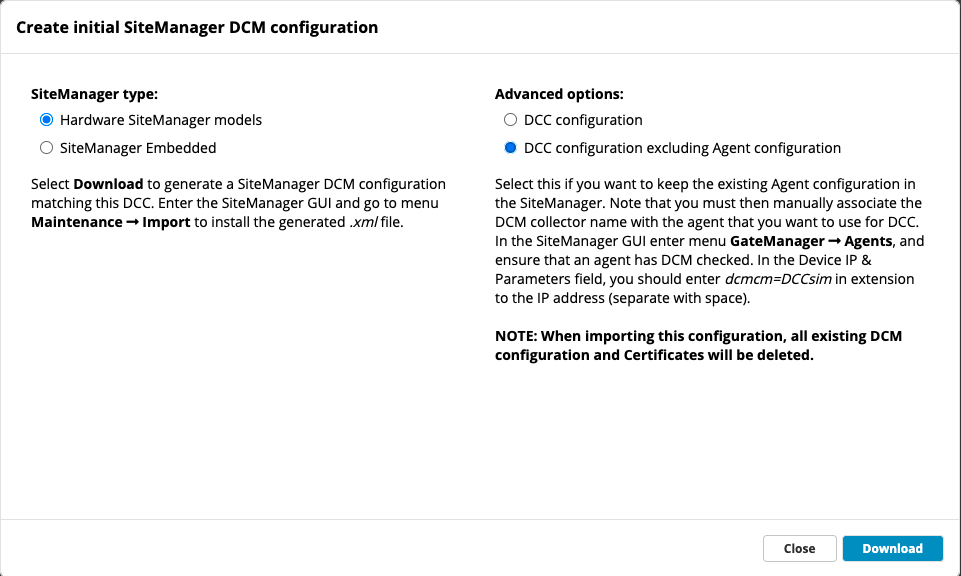
In IoT Administration click the config download button
In the popup window use the presets and click the download button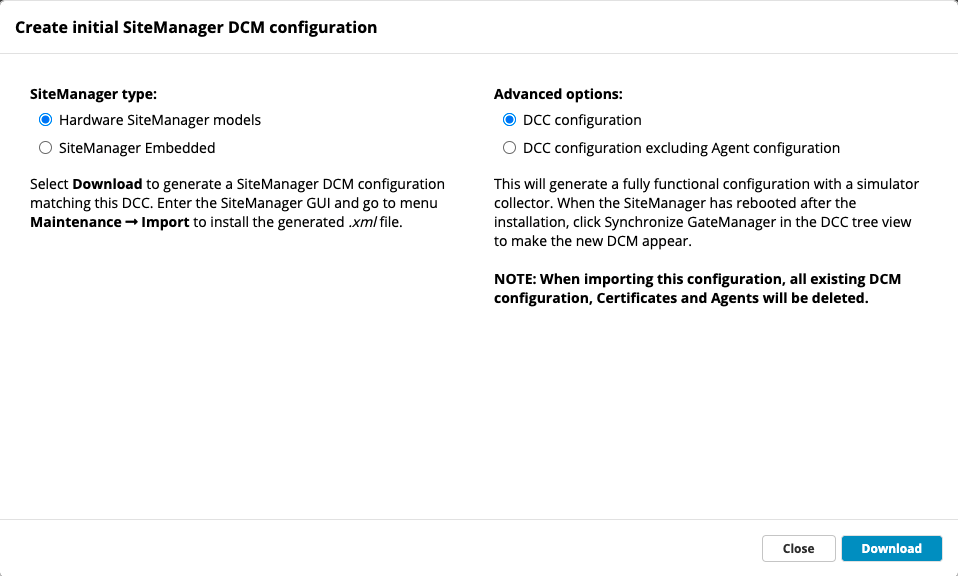
This will download this file to your preferred downloads folder.
Log in to your GateManager account and open the SiteManager GUI.
In SiteManager GUI go to Maintenance > Import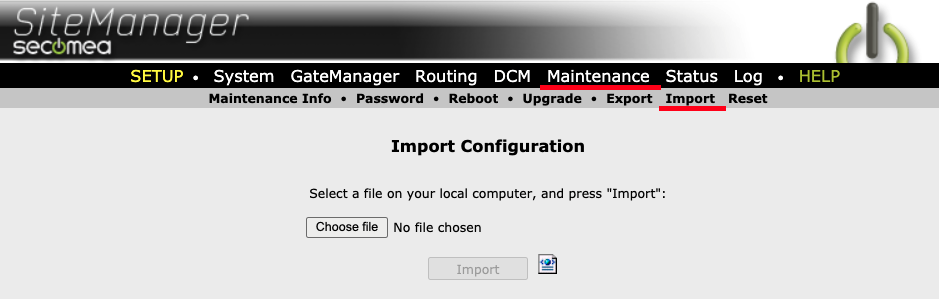
Choose the downloaded file and import it.
After the import the SiteManager needs to be rebooted.
After the reboot the status should be as seen here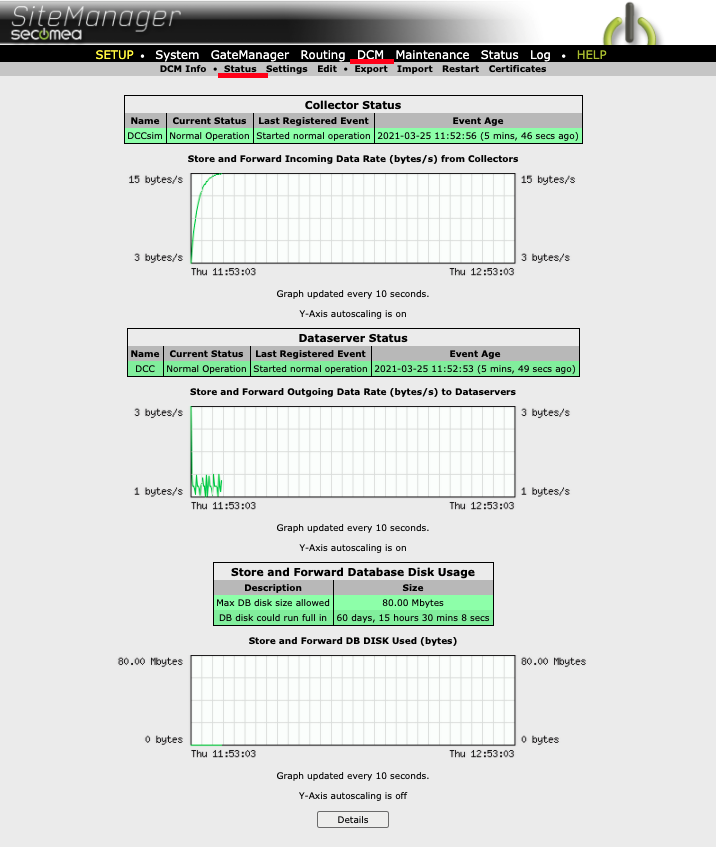
In the DCC you might need to synchronise with the GateManager domain to see the SiteManager/DCM in the tree view.
Then you can find the SiteManager/DCM in the view.
Info
The setup is created for easy Proof of Concept and that means that there is no need for setting up an NTP server.
But we STRONGLY recommend that the setting is changed for production environments.
In DCM config set "WaitForNTP" : true
In SiteManager GUI goto System > Time > and set a *suitable NTP server
- = ntp.secomea.com, time.google.com or a proprietary NTP server from your company.
Alternative PoC config
Instead of the preset config from the DCC you can choose to use a limited config or manually create agents, config and certificates.
The limited config:
This config will only delete any existing DCM config and installed certificates, but will require you to configure an agent manually with the internal IP 127.0.0.1 and the DCCsim collector name.
DCM config file used in this example:
{
    "CheckpointInterval": 600,
     "WaitForNTP": false,
    "Collectors": [
        {
            "CollectorDescription": "SDCM Internal Simulation Server",
            "CollectorName": "DCCsim",
            "Protocol": "Simulator",
            "SamplePoints": [
                {
                    "SampleDataType": "double",
                    "SampleDescription": "SDCM simulation of sine curve",
                    "SampleLimitAlarm": true,
                    "SampleLimitDiscard": false,
                    "SampleLowerLimit": -1000,
                    "SampleName": "sine",
                    "SampleUpperLimit": 1000,
                    "SamplesSaved": 300,
                    "SimulatorData": {
                        "SimulatorFunction": "sine",
                        "SimulatorIncValue": 100,
                        "SimulatorInitValue": 1000,
                        "SimulatorSampleInterval": 1
                    }
                }
            ]
        }
    ],
    "ConfigDescription": "Test configuration for SDCC with SIMs only",
    "ConfigName": "SDCC_SIM",
    "DataServers": [
        {
            "ConnectRetryMax": 12,
            "ConnectRetryMin": 2,
            "DatasrvName": "DCC",
            "DatasrvProtocol": "SCI/SPD",
            "SCISPDParams": {
                "DevCertName": "DCC Certificate",
                "DevPkeyName": "DCC Private Key",
                "PushInterval": 1,
                "RootCAName": "DCC CA Certificate",
                "SCIServerAddr": "demo-dcm-dcc.secomea.com",
                "SPDPort": 443,
                "Security": "TLS1.2"
            }
        }
    ]
}
Was this article helpful?